ILI9341 Touch connector
author: RogerParkinson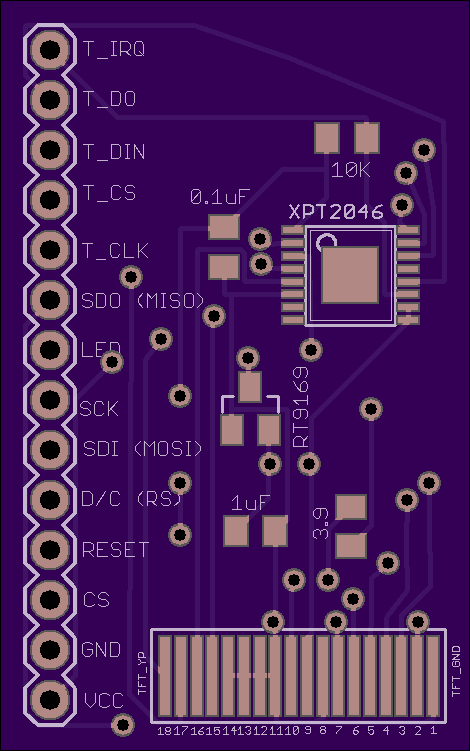

2 layer board of 0.94 x 1.50 inches (23.8 x 38.1 mm)
Uploaded:
January 03, 2017
Shared:
January 15, 2017
Total Price:
$7.00
ILI9341 connector for 14 pads + 4 pads for touch, broken out to 14 connector pins using a touch controller. It is a clone of the PCB for this screen but without the SD card and the PCB is much smaller making it useful when you have very little room to mount it. The screen itself is available separately here To build this you need a couple of resistors and ceramic capacitors as well as an RT9169 and a touch controller. I used solder paste etc for the smd parts but I hand soldered the screen. It is fiddly work but I don’t think it is a good idea to put the screen through an oven or hot plate. Be careful when soldering the screen to the board. The connections are very fine and, when soldered, rather fragile. Make sure you stick the board and screen together somehow, such as double sided tape, to prevent strain on the connection. It is important to get the screen connection around the right way. Check carefully before you solder. For details on connecting the resulting board to your processor see PJRC’s instructions
ILI9341 connector for 14 pads + 4 pads for touch, broken out to 14 connector pins using a touch controller. It is a clone of the PCB for this screen but without the SD card and the PCB is much smaller making it useful when you have very little room to mount it. The screen itself is available separately here To build this you need a couple of resistors and ceramic capacitors as well as an RT9169 and a touch controller. I used solder paste etc for the smd parts but I hand soldered the screen. It is fiddly work but I don’t think it is a good idea to put the screen through an oven or hot plate. Be careful when soldering the screen to the board. The connections are very fine and, when soldered, rather fragile. Make sure you stick the board and screen together somehow, such as double sided tape, to prevent strain on the connection. It is important to get the screen connection around the right way. Check carefully before you solder. For details on connecting the resulting board to your processor see PJRC’s instructions
