pyboard_interface_V1.brd
author: scitoast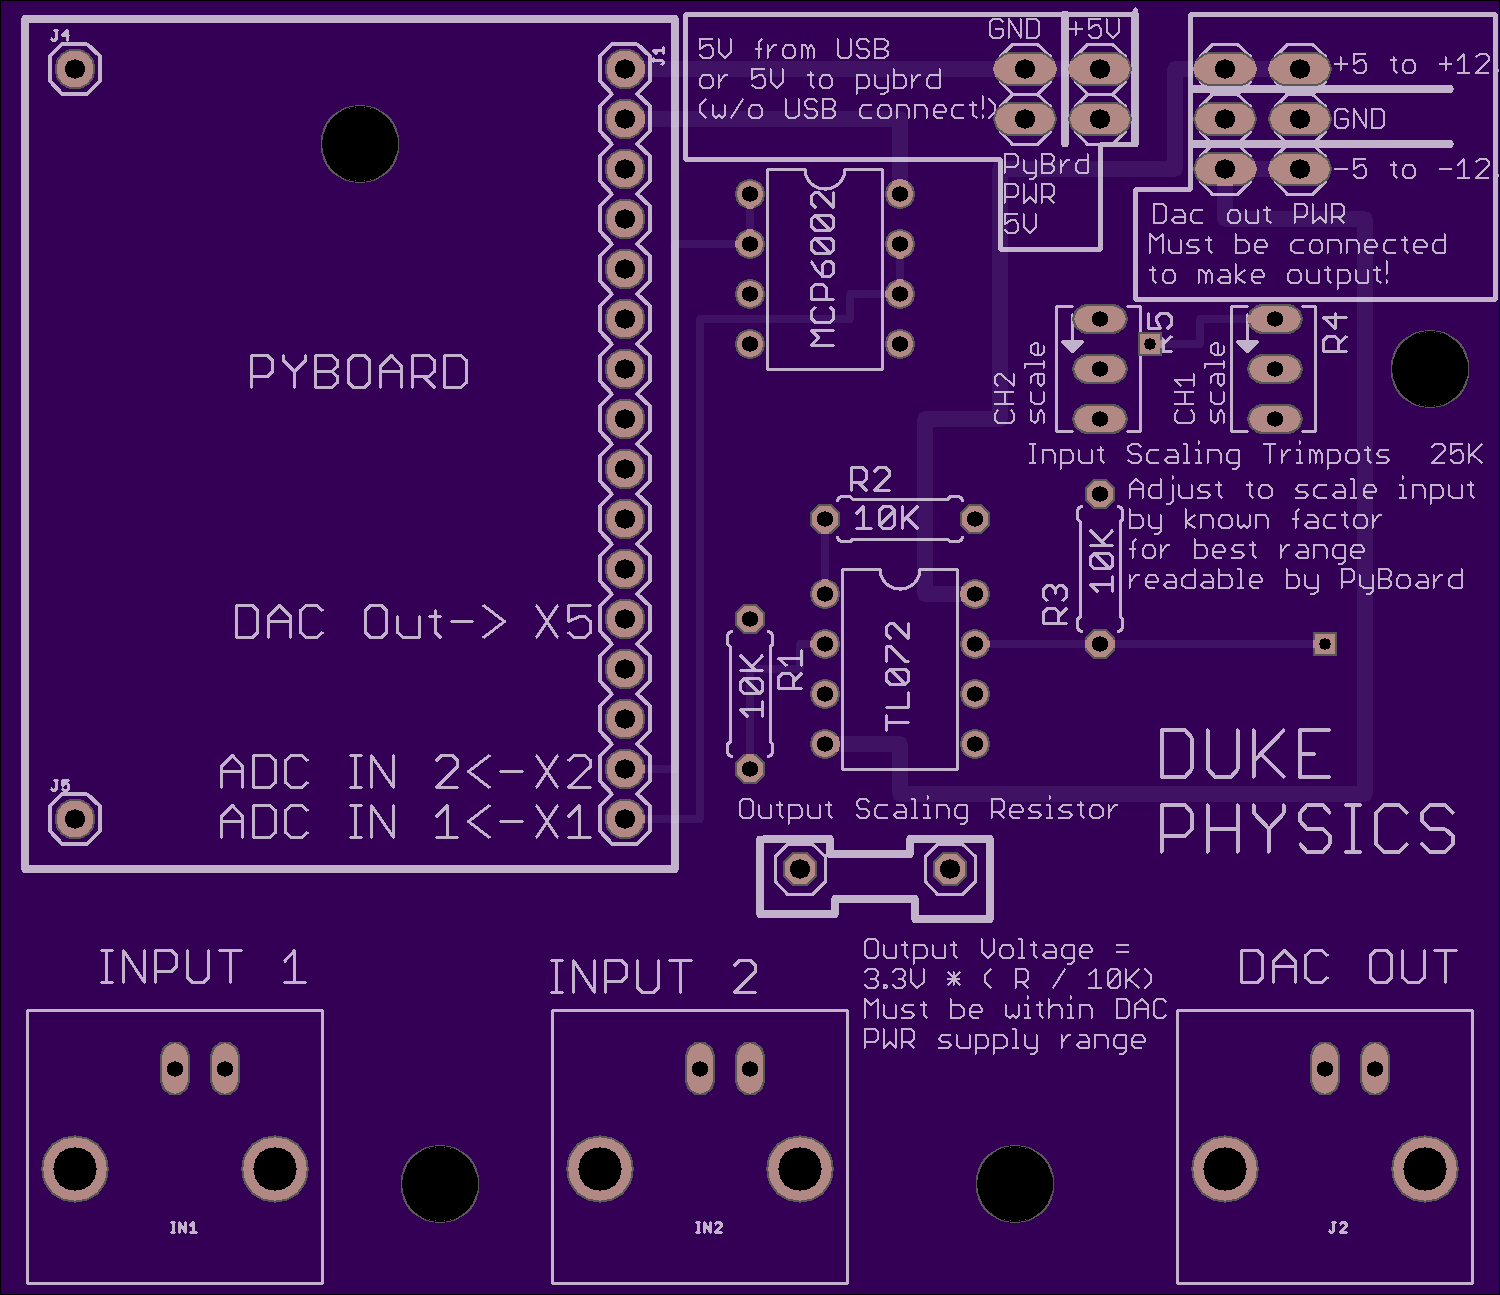
2 layer board of 3.00 x 2.59 inches (76.2 x 65.7 mm)
Uploaded:
August 01, 2017
Shared:
August 01, 2017
Total Price:
$38.80
VERSION 1 NOTES:
Trimpots should be 1M not 25K.
Issue (minor): The trimpot midpoint pins are at the top rather than in the middle of the three as they should have been. This comes from selecting the wrong Eagle package! You can instead solder a header here and wire it to an external pot, or use a trimmer with long leads, put some wire insulation around the center lead and bend this and an end lead to cross each other to fit into the proper holes.
This is not a high frequency board. It’s not meant for signals above say 100 kHz (and you will be hard pressed to get the PyBoard to do anything useful with signals any faster than that).
The input impedance is approximately the parallel resistance of the top and bottom parts of the trim pot, so if you adjust the input signal attenuation, you adjust the input impedance. (See revision list for Version 2). The board is meant to be used with an external noninverting buffer stage before the input if input impedance is critical.
This board does not provide level translation, so as-is only unipolar input signals (can be adjusted for up to 0 - 10 V) will be detected. It is relatively safe to apply signals that are too big because the MCP6002 will merely clip them to the 0-3.3V range of the PyBoard.
Bipolar signal input hack
You can “hack” it to allow bipolar input signals by soldering two 100k resistors between 0 and +5V rails as a voltage divider, then wiring the center of the divider to the non inverting input pins of the MCP6002 op amp socket. This will of course affect input impedance.
REVISION LIST FOR VERSION 2:
These are changes to be implemented on a future version.
Add noninverting buffer stage to inputs with constant, designed 1Mohm input impedance.
Add level translation for inputs to allow bipolar signals.
Add inductive filter on 5V rail to reduce digital noise from the PyBoard (esp. when supplied from USB)
Change trimpot pins so trimpot center tap is the center pin
Add spot for optional output AC coupling capacitor to eliminate the DC bias of PyBoard DAC.
What is this?
Op-amp buffered/scaled input & output to/from PyBoard via BNC connectors. This circuit is nothing fancy and version 1 is probably not even a very good design.
MCP6002 provides attenuation to allow input voltages up to 0-10 V (unipolar only). These will be scaled (and clipped if necessary) to the 0-3.3V range of the PyBoard. See Version 1 Notes.
To omit input scaling and have very high input impedance (equal to that of the MCP6002 datasheet) you can simply bridge the trimpot center terminal to the top terminal. Maximum signal will be 0 to 3.3V in this case. Note that no voltage translation is provided.
MCP6002 is powered on 3V3 rail and will clip any signal excursions beyond 3.3V or below 0. This is very convenient because PyBoard inputs are not well protected.
TL072 provides non-inverted buffered output signal of DAC on pin X5. Requires external bipolar supply to be plugged onto the board (viz, 2 9V batteries connected with a common center). You can set the scaling of the output voltage by suitable selection of scaling resistor. Recommend using a socket for this resistor so you can change it as needed. Note that the -12V rail IS strictly necessary – even if your output signal is only positive.
PyBoard will be plugged onto 16 pin female header. Recommend on PyBoard itself to solder on extended-pin length female headers (available e.g. Adafruit) so that you can make connections with other PyBoard pins on the PyBoard itself as well as being able to plug it onto this in/out board.
All fixed resistors are 10K 1% or 0.1%
