ATTinyProgrammer
author: RVProject
2 layer board of 2.17 x 1.83 inches (55.1 x 46.4 mm)
Uploaded:
December 13, 2017
Shared:
December 26, 2017
Total Price:
$19.75
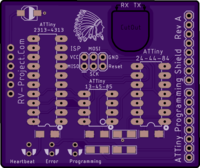
ATTiny Programmer Shield for Arduino Uno. I really like ATTiny projects. They are challenging to get everything to work in such a limited device, but the rewards are fantastic. Small projects, such as battery monitors, LED dimmers, and the like are possible; especially when using a larger microcontroller would be overkill..
I had been using SparkFun’s PGM-11801 Tiny AVR Programmer, but had a lot of trouble with the driver. Twice it just quit, and I had to reinstall the Arduino IDE and play around with stuff to get it to work again. I want to build stuff, not troubleshoot drivers. Besides, I want to program other ATTiny microcontrollers, not just the ATTiny85.
So I ended up going the route of using an Arduino Uno as the programmer, and it has been flawless. While you do not need a shield (you can breadboard the programmer), a dedicated shield really helps your production efforts. And if you are like me, you will have a spare Uno or two lying around you can dedicate for the programmer.
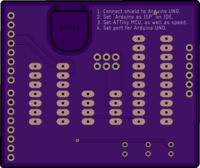
To program ATTiny microcontrollers, you need an Arduino Uno, this shield, and the ATTiny library, which is available from a lot of sources. To setup the Uno, use the built-in ArduinoISP sketch as is (no changes needed), and upload to the Uno. Note to do ArduinoISP upload, do not install the shield as the 10uF capacitor will not allow you to write to the Uno.
Once you have the sketch uploaded to the Uno, install the shield and setup the Arduino IDE to your favorite ATTiny board, set the board speed, and set the programmer to “Arduino as ISP”.
That’s it. You should then be able to burn the ATTiny bootloader or upload sketches to the ATTiny.
Please see http://www.RV-Project.com/projects/arduinoide.php for more information or to see more projects.
Parts List:
0.1uF 1206 capacitor (3 reqd).
1kohm 1206 resistor (3 reqd).
10uF@16V SMD capacitor (1 reqd).
3mm LED of your favorite colors (3 reqd).
Eight, 14, and 20pin IC sockets (one of each).
header pins for ISP connector and shield to Uno connection.

Note: the little cutout window in the PCB allows you to see the Rx/Tx LEDs on the Arduino Uno. See, I have thought of everything with this board.
ATTiny Programmer Shield for Arduino Uno. I really like ATTiny projects. They are challenging to get everything to work in such a limited device, but the rewards are fantastic. Small projects, such as battery monitors, LED dimmers, and the like are possible; especially when using a larger microcontroller would be overkill..
I had been using SparkFun’s PGM-11801 Tiny AVR Programmer, but had a lot of trouble with the driver. Twice it just quit, and I had to reinstall the Arduino IDE and play around with stuff to get it to work again. I want to build stuff, not troubleshoot drivers. Besides, I want to program other ATTiny microcontrollers, not just the ATTiny85.
So I ended up going the route of using an Arduino Uno as the programmer, and it has been flawless. While you do not need a shield (you can breadboard the programmer), a dedicated shield really helps your production efforts. And if you are like me, you will have a spare Uno or two lying around you can dedicate for the programmer.
To program ATTiny microcontrollers, you need an Arduino Uno, this shield, and the ATTiny library, which is available from a lot of sources. To setup the Uno, use the built-in ArduinoISP sketch as is (no changes needed), and upload to the Uno. Note to do ArduinoISP upload, do not install the shield as the 10uF capacitor will not allow you to write to the Uno.
Once you have the sketch uploaded to the Uno, install the shield and setup the Arduino IDE to your favorite ATTiny board, set the board speed, and set the programmer to “Arduino as ISP”.
That’s it. You should then be able to burn the ATTiny bootloader or upload sketches to the ATTiny.
Please see http://www.RV-Project.com/projects/arduinoide.php for more information or to see more projects.
Parts List:
0.1uF 1206 capacitor (3 reqd).
1kohm 1206 resistor (3 reqd).
10uF@16V SMD capacitor (1 reqd).
3mm LED of your favorite colors (3 reqd).
Eight, 14, and 20pin IC sockets (one of each).
header pins for ISP connector and shield to Uno connection.

Note: the little cutout window in the PCB allows you to see the Rx/Tx LEDs on the Arduino Uno. See, I have thought of everything with this board.

